Collapsible Trekking Poles: Fit, Locks & Trail Technique
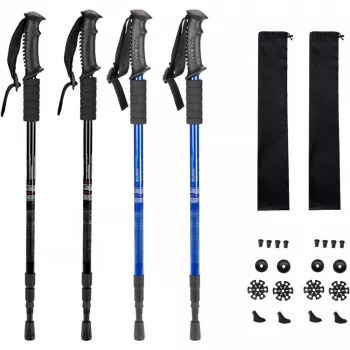
Collapsible Hiking Trekking Poles: Comfort, Stability, and Smart Trail Technique
Collapsible trekking poles can reduce strain on knees, add stability on uneven ground, and improve rhythm on long days—especially when properly fitted and used with the right tips and baskets. A packable set is easy to stash when terrain smooths out, then deploy quickly for descents, stream crossings, or slick sections. Below is a practical guide to what collapsible hiking trekking poles help with, how to size and use them, and what details most change the feel on real trails. For more guidance, see Stability and Strength: Choosing the Right Trekking Poles ….
What Collapsible Trekking Poles Help With on the Trail
Trekking poles do more than “take weight off your legs.” Used deliberately, they improve how you move through unpredictable terrain while helping you stay efficient over hours. For further reading, see Trekking Poles.
- Stability on loose surfaces: On gravel, scree, mud, patchy snow, and stream crossings, poles widen your base of support and give you extra contact points when footing is uncertain.
- Reduced impact on descents: Poles can share load between legs and upper body, lowering cumulative pounding—especially on long downhill grades.
- Better pacing on climbs: A steady plant rhythm often encourages a consistent cadence, which can make sustained uphill hiking feel smoother.
- Confidence with heavier packs: When your center of gravity shifts (backpacking load, winter layers, water carry), poles help you correct balance sooner.
- Support for steps and ledges: For roots, uneven rock steps, and broken trail, a well-placed pole can act like a third point of contact as you transfer weight.
For additional technique guidance and trail-use scenarios, REI’s trekking pole overview is a solid reference: REI Co-op Expert Advice: Trekking Poles — How to Choose and Use.
Quick Setup: Fit, Adjustments, and Hand Position
Small setup mistakes add up quickly: tight shoulders, sore hands, and poles that “feel useless.” A quick, repeatable setup routine keeps things comfortable.
- Start with the 90° elbow check: On flat ground, adjust pole length so your elbow is close to a 90° bend when the tip is on the ground near your foot.
- Adjust by terrain: Shorten slightly for climbs; lengthen slightly for descents so you can plant without hunching or reaching.
- Use straps to carry load: Bring your hand up through the strap loop, then settle your hand down so the strap supports your wrist/palm. This reduces grip fatigue.
- Stay relaxed up top: Keep shoulders down and elbows softly bent; avoid locking elbows or “punching” the poles forward.
- Re-check locks: Temperature shifts, repeated impacts, and vibration can loosen mechanisms—especially on long descents or rocky trails.
Adjustment Cheat Sheet
| Terrain | Pole length | Placement focus | Common mistake to avoid |
|---|---|---|---|
| Flat trail | Neutral (elbow ~90°) | Light rhythmic plants | Over-gripping handles |
| Uphill | Slightly shorter | Plant behind for push | Reaching too far forward |
| Downhill | Slightly longer | Plant ahead for stability | Locking elbows on impact |
| Sidehill | Lower pole downhill side | Stabilize hips and ankles | Keeping both poles same length |
Materials, Locks, and Packability: What Changes the Feel
Two poles can look similar online yet feel very different after 8 miles. Pay attention to the core build details that affect durability, vibration, and ease of adjustment.
- Shaft material: Aluminum typically resists dents and hard knocks well; carbon fiber often feels quieter and damps vibration but can be more brittle under sharp impacts.
- Lock type: Lever locks are fast to adjust and easy to verify at a glance. Twist locks can be compact, but they may slip if worn or not tightened correctly.
- Number of sections: More sections usually means a shorter collapsed length (better packability) but can introduce a bit more flex compared with fewer sections.
- Grip and strap comfort: If hands sweat easily or you hike in cold conditions, handle texture and strap softness matter more than you’d expect on longer outings.
- Tips and baskets: Small baskets suit general trail use; larger baskets help in soft ground or snow. Rubber tips reduce noise and can improve traction on rock or pavement, depending on conditions.
Trail Technique for Less Fatigue (Especially on Long Descents)
Technique is the difference between “poles help a little” and “poles save my knees.” Focus on efficient plants that support your body position rather than forcing long reaches.
For broader hiking safety reminders—especially when conditions change quickly—review the American Hiking Society’s guidance: American Hiking Society: Hiking Safety and Preparedness.
Care, Storage, and Safety Checks
Featured Gear Picks (In Stock)
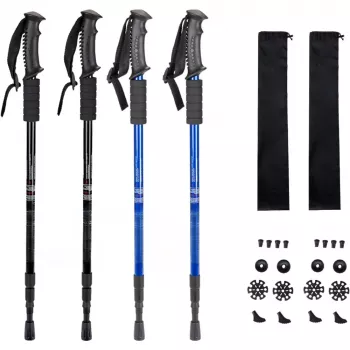
- Collapsible Hiking Trekking Poles — A packable option for day hikes and variable terrain where quick adjustments and easy storage are a priority.
- Passport to Savings: How to Fund Your Dream Trip Without Going Broke – Budget Travel Guide (eBook) — Helpful planning support for hikers who travel often and want to keep gear trips affordable.
FAQ
How tall should trekking poles be for hiking?
Set a baseline length where your elbow is close to a 90° bend on flat ground. Then shorten slightly for climbs and lengthen slightly for descents; relaxed shoulders are a good final check.
Do trekking poles actually help with knee pain on descents?
They can reduce cumulative impact by sharing load and improving stability, especially on long downhills. The biggest gains usually come from correct length, proper strap use, and planting poles before stepping down.
Are collapsible poles strong enough for rough trails?
They can be, but real-world strength depends on the shaft material, section design, and the locking mechanism. Regular lock checks and solid planting technique matter as much as the build when trails get rocky and uneven.








Leave a comment